Thursday 26 December 2019

My new greenhouse

For quite a while now I have dreamed to own a greenhouse but never got one as I could use a small corner of the large greeenhouse at my workplace which has lighting and heating. But change of management meant that I had to vacate my little space there and look for other options to grow plants undercover. I had a look around on the internet and came across a small sturdy greenhouse (Halls Popular 6x6) which was recommended for allotment sites. The greenhouse also came with polycarbonate glazing and a steel base with ground anchors. As we are not allowed any glass on the allotment site this was perfect so I took the plunge and ordered one.

I already had the place where the greenhouse was supposed to go in my mind and just had to measure it to make sure there was really enough space there. Next I had to shift quite a lot of soil to level the area and get it ready for the greenhouse assembly.

I shifted lots of soil to make space for the new greenhouse
The crazy paving path for inside the greenhouse is finished
Three weeks later the big day had come and the greenhouse arrived on the allotment site in two boxes. I found it quite amazing that there was actually a complete greenhouse in these two not overly large boxes! The prospect of assembling the greenhouse from scratch was quite daunting but luckily I had my two friends Sarah and Lucy helping me which made it much easier.
The parts were all packed together in the order they had to be put together, base, back, front, the two side parts, roof, window and door with the polycarbonate sheets in the second cardboard box. All parts had numbers which corresponded to the numbers and pictures in the instruction booklet.

We started with the base which was very easy but one of the bolts was dodgy so it was lucky I found another one in my little screw and bolt collection. The base had anchors which we buried in the ground and made sure everything was level.

The greenhouse base is in place
 Next we put the back and front together which was straight forward as the instructions were quite clear. We only had to make sure the parts were put together in the right way. The side parts were next and were as straight forward as the front and back. Once all of these parts were finished we bolted them all together and attached the roof. The roof window went in and in the next step the whole greenhouse frame was securely attached to the base.

Front and back of the greenhouse are put together
The greenhouse frame is finished and bolted to the base
The roof window is in as well
Building the door was relatively easy but attaching it to the greenhouse frame proofed quite tricky as the instructions were a bit difficult to understand. After several failed attempts I realised we had to turn one of the door parts around which eventually did the trick and finally the door was finished as well.

The door was quite tricky to attach to the frame
Now the next steps involved getting the greenhouse frame ready for the polycarbonate glazing. Thin rubber strips needed to be attached to the frame and alluminium end strips to the polycarbonate sheets. Attaching the rubber strips was time-consuming but straight forward. Attaching the alluminium strips to the top and bottom of the polycarbonate sheets proved much more difficult as they were very stiff and it was nearly impossible to push them onto the sheets. After much swearing I finally had the idea to squeeze the top and bottom of the polycarbonate sheets slightly together with the help of some pliers and finally the alluminium strips could be attached to the sheets.

After all the time-consuming preparations the actual glazing was easy and relatively quick. The sheets had to be attached the right way around as only one side was treated with UV protection so we had to be careful. The sheets themselves were attached to the greenhouse frame with W-shaped metal clips. We used nearly double the amount of clips than recommended just to be on the safe side. The sheets seem quite secure and nothing is moving. We had a few stronger winds now and still everything is in place.
All in all it took us about two days to build the greenhouse.

All the polycarbonate sheets are in
I am happy :-)
Myself with my friend Lucy (inside the greenhouse)
I have started sowing a few things already now, some radishes, lettuce and kohlrabi and a couple of perennials. At the end of January I will sow some more perennials and the bulk of vegetables and flowers from March onwards. A few tender vegetables such as tomatoes, beans, sweetcorn and courgettes I will start at home in my mini greenhouse in the back garden and only transfer them to the greenhouse on the allotment once it is safe to do so. I also want to try out a few grafted vegetable plants such as cucumber, melon and tomatoes so see what the difference is to conventional non-grafted plants. Apparently grafted vegetable plants are much stronger growing and produce a lot more yield.
I have also planted a blood peach tree 'Sanguine de Savoie' at the back of the greenhouse which I will fan-train so it does not take up too much space. This peach is apparently one of the tastiest peaches in the world which I hopefully can soon confirm.


Sowing has started
Exciting times are ahead and I am really looking forward to filling the new greenhouse with lots of different vegetables and flowers next year.

The new greenhouse sitting comfortably between the grasses and other perennials

Monday 9 December 2019

Spring bulbs for pollinators

Late winter and early spring are a difficult time for early pollinators as not much is flowering, especially if the weather is warm and bumblebee queens and other early pollinators have woken up too early. But it is easy to plant some early bulbs to provide food and nectar for hungry garden visitors.

First to flower are Winter aconites (Eranthis hyemalis), flowering in January. Strictly speaking, these plants do not grow from bulbs (a short stem with fleshy leaves which functions as a food storage organ during dormancy) but from tubers (enlarged structures used as storage organs for nutrients, often associated with roots). I have only seen pollinators visiting the flowers a few times on very mild winter days because they flower a bit too early. But in a warm spell in January they are certainly useful. Winter aconites grow best in moist humus-rich but well-drained soil under deciduous trees.

Winter aconites flower very early in the year

Flowering in January and February are snowdrops which have delicate-looking flowers but are tough as old boots. They can even be covered completely by snow or get frosted repeatedly and look no worse for wear. It is best to plant snowdrops "in the green" in February meaning as plants which have just finished flowering. The bulbs don`t survive long when they are out of the ground as they dry out too quickly, that is why it is not worth buying bulbs from garden centres in autumn.


Bumblebee queens like visiting snowdrops

Two red-tailed bumblebee queens
Crocuses start flowering in February and continue into March. They are great plants for bumblebee queens, hoverflies and early solitary bees. Planted in large clumps all over the garden provides pollinators with a useful food resource. I have planted small amounts of bulbs in different places on the allotment years ago which multiplied nicely and I have now many large clumps. I prefer the small species crocuses such as Crocus crysanthus and C. tommasinianus over the large dutch crocuses but all provide pollen and nectar. Crocus likes sunny well-drained areas of the garden and also grows well in grass.


A pretty little hoverfly (probably Scaeva pyrastri)
This bumblebee queen is nearly too heavy for the crocus flower
An early solitary bee (Andrena sp.)
A hungry buff-tailed bumblebee queen
A white-tailed bumblebee queen visiting a Crocus crysanthus flower


Andrena bicolor, a solitary bee
The first tulips start flowering in March, with the last ones flowering in May. There are lots and lots of large-flowered cultivars but I prefer the smaller wild tulips such as Tulipa sylvestris, T. turkestanica and T. saxatilis as they look after themselves and come back every year planted in my well-drained soil. I also think they are more attractive to bees and hoverflies. Tulips need sunshine and well-drained soil which should not be too rich as most wild tulips come from mountain areas in eastern Europe and Asia.


A garden bumblebee queen visiting a tulip flower
Another Andrena bicolor inside a tulip flower


Another great bulb for pollinators, flowering in March and April, are grape hyacinths (Muscari). I have seen all sorts of pollinators visiting the flowers, but especially solitary bees and butterflies. The common grape hyacinth Muscari armeniacum can spread quite a lot when happy but there are many other more well-behaved grape hyacinths such Muscari latifolium and some cultivars of Muscari armeniacum. Muscari like similar conditions to wild tulips but can grow well in normal garden soil as well.

This small tortoiseshell butterfly likes the Muscari flowers

You might wonder why I have not mentioned daffodils which fill road verges and gardens with colour in spring but in my opinion they are not as good for pollinators as the other bulbs mentioned. Wild daffodils (Narcissus pseudonarcissus) are probably the best to grow, but the more showy cultivated daffodils don`t offer much pollen and nectar.

Most bulbs can be planted in September and October, but tulips are best planted late October and November as they will be less susceptible to tulip fire then. Snowdrops and Winter aconites are best planted "in the green" just after flowering in late winter.

Monday 25 November 2019

Oca and Chinese artichoke: Two interesting root vegetables

Oca (left) and Chinese artichoke (right)
A while ago I had written a blog post about the unusual fruit and vegetables I am growing on my allotment. Among these were two root vegetables, oca and Chinese artichoke. I am now in a position where I can report back on these vegetables and if they are worth growing as I had them on the allotment for a full growing season, have harvested and eaten them.


Chinese artichoke

Chinese artichoke (Stachys affinis) is part of the mint family (Lamiaceae) and related to our native Stachys sylvatica and S. palustris. The difference is that Chinese artichokes produce edible tubers along their roots. The plant itself is not very pretty; on my allotment it grew to around 60 cm and had nondescript dark green leaves and very small purple flowers. I would not plant it in a flower border but it would be right at home in a vegetable garden. The tubers can be planted any time from autumn to early spring directly where they are to grow. Once the soil warms up they grow away without any problems and don`t need much care over the summer apart from keeping the weeds down and the occasional watering in a dry spell. The plants died back in October, and in November I harvested the tubers. I had planted a short row, 5 tubers in total, about 20 cm apart, in February, and harvested about 45 decent-sized tubers in November. I left all the smaller tubers in the ground as they will grow into new plants in spring. For this reason it is best to give Chinese artichokes a permanent position as it is nearly impossible to get all the small tubers out of the ground. To remove these plants from the vegetable plot completely they need to be left to grow and dug out in summer before the tubers have formed.

Now the taste test. I washed the tubers thoroughly as they don`t need to be peeled. I then cooked them in lightly salted water for about 7 min until tender. I had them as a side dish with calabrese and mashed potatoes, but they would fit into many other dishes as well. I was pleasantly surprised as the tubers have a slightly creamy, buttery consistence and a really nice nutty flavour.

Chinese artichokes are a tasty treat


Conclusion: Chinese artichokes are easy to grow and don`t need much care. Harvesting is easy but the yield is low as the tubers are quite small and each plant does not produce great amounts of them. The taste is great, nutty and delicious. This vegetable needs to be used as a special treat, not a stable food such as potatoes, due to the low yield. I am already looking forward to my next harvest in a year`s time.

Oca

Oca (Oxalis tuberosa) is part of the oxalis family (Oxalidaceae) and related to our native wood sorrel (Oxalis acetosella). The plant has clover-like leaves and yellow flowers in early autumn. The tubers are only produced in autumn when the days are getting shorter and for that reason the plants need to  grow for as long as possible into autumn and early winter to produce the highest yield.
I planted the tubers singly into pots in April and left them in the greenhouse until I could see the first shoots growing. The plants are very frost tender so cannot be planted out before the middle of May at the earliest. You can also plant the tubers directly into the ground from mid-May onwards. The plants need quite a lot of space, I planted the tubers around 40 cm apart from each other. At first oca grows quite slowly but once it gets going in summer it grows into quite enormous plants which later in summer sprawl over the ground. Don`t underestimate the space oca will need. I also watered the plants in dry spells.

Young oca plants in June

Oca plants (behind the leeks) in July
From autumn onwards you need to watch for frost as oca will produce more tubers as longer it is in the ground in autumn and early winter. Even a light frost will damage the leaves but it helps to cover the plants with a thick fleece when frost is forecast.
I harvested my oca in the middle of November once the leaves had died down after a heavy frost. I found quite a lot of tubers, about 20-30 tubers per plant, which were growing close to the surface so were easy to harvest. Do not leave the tubers in the ground over winter as they will not survive a heavy ground frost. They are easy to store in a plastic bag in a cold but frost-free shed or in the fridge. The tubers will keep until spring when they can be brought back into growth to start the cycle again. So don`t eat all of the tubers :-).

Now the taste test. I washed the tubers thoroughly and, as with  the Chinese artichoke tubers, they don`t need to be peeled. I cooked them in slightly salted water for about 10 min until soft. The taste was very good, like a flavourful potato with a slight hint of lemon. Raw the tubers taste like a crunchy apple with a lemon flavour but I prefer them cooked.

Oca tastes like a flavourful potato


Conclusion: Oca is easy to grow and does not need much care apart from regular watering in dry spells. The plants seem to be quite free from diseases and had no slug or caterpillar damage at all. For a good yield they need to be protected from frost in autumn as long as possible, best until at least mid-November. The taste is excellent and the yield much better compared to Chinese artichokes. But in my opinion it is worth growing both as they do taste different.

Thursday 14 November 2019

10 ideas for a wildlife-friendly garden or allotment

I have gardened with wildlife in mind for a long time now and would not garden any other way anymore. Creating a wildlife-friendly space is fun and brings a sense of achievement when you see all the different pollinators visiting the flowers you planted, the frogs colonising the pond you built and birds eating the aphids you have worried about. You will soon have a thriving ecosystem which does not need too much of an input and mainly regulates itself. As we need a lot more wildlife-friendly gardens and allotments to make a real difference I thought I give some ideas to make your garden or allotment more wildlife-friendly as well:

1. Build a pond

Probably the best thing you can do is building a pond (have a look here how I built mine). It creates a whole new world for animals and plants to colonise, many of these cannot live anywhere else. Frogs, toads and newts need a pond to breed, as well as quite a lot of insects such as dragonflies, damselflies and stone flies. There are also lots of small animals which life in the pond all their life such as water fleas and water snails. The pond also provides a convenient opportunity for terrestrial animals such as foxes, hedgehogs and birds to drink, the latter also like to clean their feathers in shallow water. The pond does not have to be large, small ponds will attract wildlife as well. But in my opinion, larger ponds are easier to maintain and don`t loose water through evaporation in summer as rapidly as small ponds do. It is also easier to create lots of shallow areas and a deeper part in the middle which would be ideal.

Small ponds attract a lot of wildlife as well
Frogs will soon find newly-built ponds


2. Don`t use pesticides

7-spot ladybird larva
It is possible to have a healthy, thriving garden or allotment without using pesticides. It often requires a bit of tolerance and to just let things be. I have aphids on my allotment but never in great numbers, normally, after a week or so the predators move in and the aphids disappear quickly, just to pop up somewhere else. Ladybirds, birds, spiders, some beetles, earwigs and wasps for example like eating aphids and many other pest insects as well, but they need something to feed on to be able to breed and thrive. To attract butterflies and moths to the garden, caterpillars need to be tolerated as well. Some caterpillars can get out of hand such as large and small white which eat cabbages, but the plants are easily protected with some simple netting.
Slugs are eaten by numerous frogs which live in and near the pond (another reason to build a pond) and also the hedgehog, who comes for frequent visits.

Without caterpillars there are no butterflies and moths
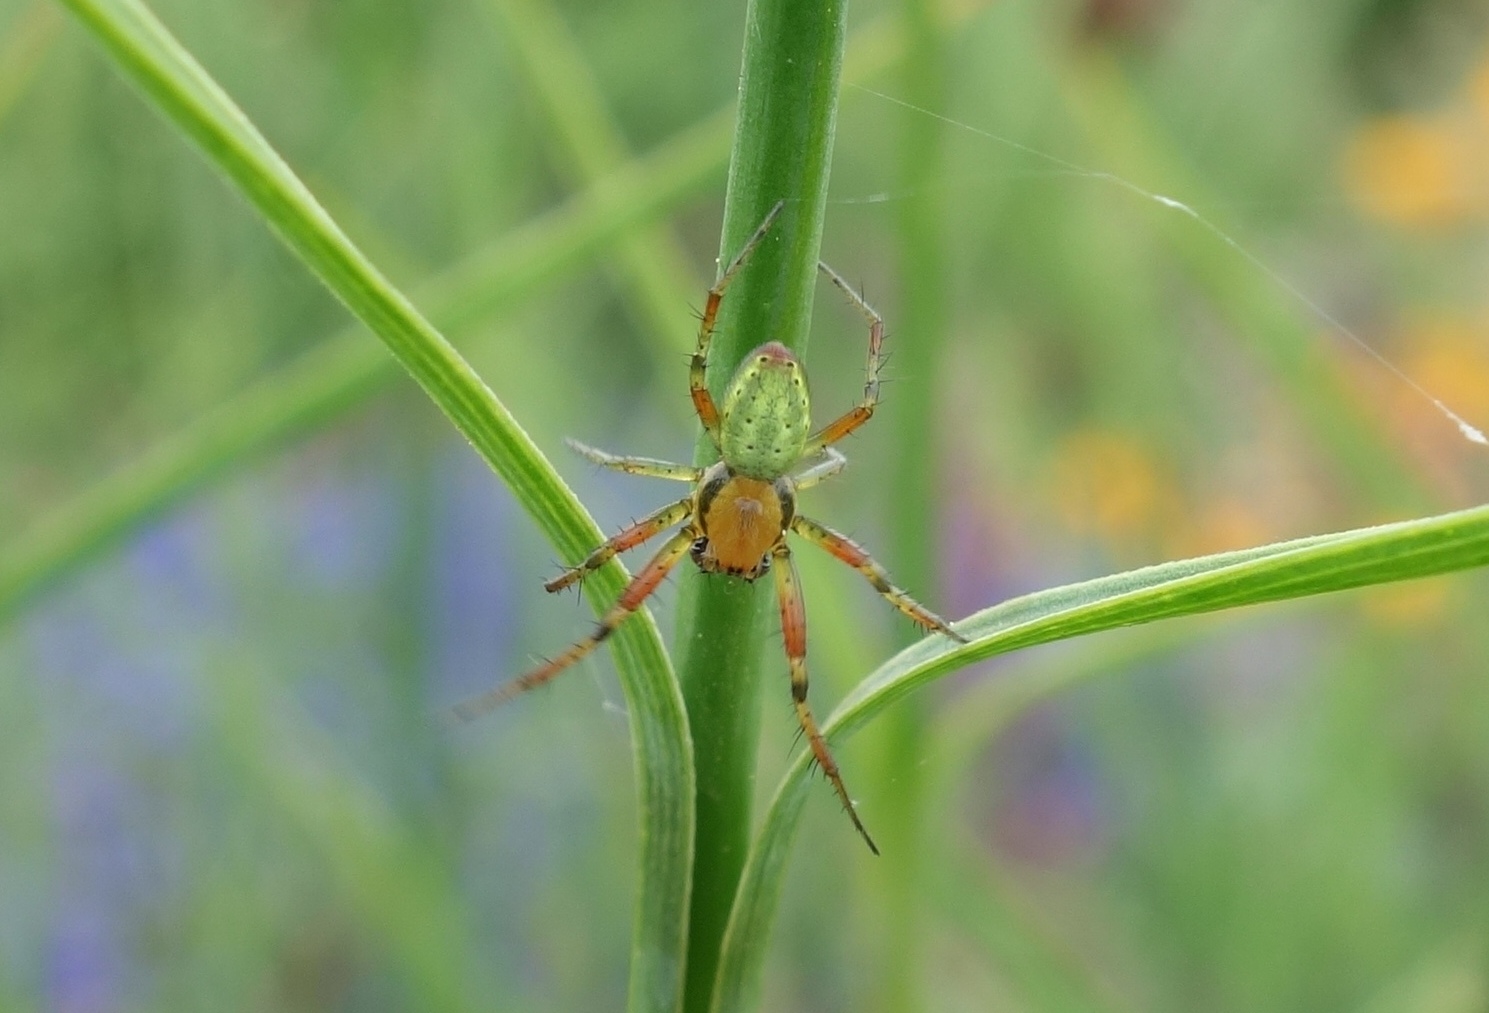
Spiders thrive in wildlife-friendly gardens and do some useful pest-control
Hoverflies are good pollinators, many larvae also eat aphids
I have never used any herbicides. Weeds can be dug out and composted (bindweed roots first need to be drowned in a bucket of water but so far I have been ok with composting couch grass). I have cleared 3 allotment with digging all the weeds out by hand and piling them up into large heaps. I then covered them with a weed fabric. After 6 months I had nice compost which I could spread back onto the allotment beds.

Weeds cleared from the allotment are rotting down under the weed fabric


3. Don`t be too tidy

Ladybirds often overwinter in leaf litter
Leaving piles of leaves and twigs under shrubs and larger perennials and not tidying all dead organic matter up all the time, leaving bare soil everywhere, creates essential habitat for insects such as ground beetles, woodlice and centipedes, and also food for worms. Birds and hedgehogs like going through the leaves to search for food, on bare soil there would be nothing for them to find.
It is also a good idea to create a log pile with any left-over logs and prunings from shrubs and trees instead of burning them which unfortunately seems to be commonplace on my allotment site.


4. Plant a tree (or two)

Fruit trees have beautiful blossom in spring
Trees add another layer of potential habitat to the garden or allotment. They also provide structure, shelter from wind and a convenient place to hang bird feeders and nest boxes. On hot summer days I relish the shade created by the trees as the allotment is otherwise quite sunny. It also gives me some place to plant shade-loving plants.
Fruit trees are especially good as they are full of flowers in spring and yummy fruit in summer or autumn. Don`t harvest every single fruit but leave some behind for the birds and other wildlife to eat. I have planted a lot of fruit trees now,  the earliest such as cherry plum and nectarine flowering in March and the latest ones such as quince and medlar flowering in May. Apple and plum trees are somewhere in between.


A good crop of Morello cherries


5. Leave seed heads standing

Monarda fistulosa has pretty seed heads
A garden without seed heads would look quite bare in winter. Many seed heads provide structure until late winter and look beautiful on a frosty morning. They also provide natural food for birds in winter. I often see gold finches eating the seeds especially from Echinacea, Centaurea and Rudbeckia. Not all plants are suitable for long-lasting seed heads as some, such as Geranium species, look quite sorry for themselves after the first sharp frosts and need to be cut back. Some of the best seed heads are produced by Phlomis, Echinacea, Eryngium, Rudbeckia, Echinops, Anthemis, Monarda, Inula, Telekia, Veronicastrum and most ornamental grasses.


Seed heads add structure to a garden in autumn and winter


6. Make your own compost

This composting area even includes a small wildflower meadow
A compost heap is a world on its own, full of bacteria, fungi and invertebrates all helping to decompose the organic matter we add to the heap. This bounty attracts lots of other animals as well such as predatory insects feasting on the smaller animals. The warmth and shelter provided by a compost heap attracts hedgehogs, frogs, toads, slow worms and sometimes also grass snakes. I have 9 composters, all open and accessible which I empty once a year in early spring. I try not to disturb the compost too much in the rest of the year, especially in winter, as some animals will be over-wintering in the compost heaps. I have a family of wood mice living under one of the composters which I regularly see on my wildlife camera. I have also seen shrews and hibernating bumblebees. When I still lived in Germany I had a hedgehog family living in my compost heap, on hot summer days they would sometimes come out and relax outside the compost, mom sleeping, with the little hoglets exploring the surrounding area.


7. Plant as many plants as you can

Fill every space available with plants, as greater the diversity of different plants as better for wildlife the garden will be. Plant a mix of native and non-native plants to give a long flowering season and provide food for a wide range of insects. Many herbivorous insects are very specialised and would not touch any non-native plants so to cater for them you need native plants. There are many very pretty native plants such as ragged robin (Lychnis flos-cuculi), red campion (Silene dioica) and black knapweed Centaurea nigra). Try to have something in flower all year, starting with snowdrops and crocuses in January and February, ending with Mahonia and Christmas box (Sarcococca) in December. There are also some late-flowering perennials such as Aster tataricus, flowering until early December, which are good for late pollinators.


Crocus provides pollen and nectar in early spring
Horehound (Marrubium) is a great plant for bumblebees


8. Create a wildflower meadow

At its simplest you could just leave some grass to grow long, cutting it twice a year in August and late winter. You will be surprised what flowers will be coming up. I have created my two little wildflower meadows from scratch by sowing a perennial wildflower seed mix on bare ground. I have also added yellow rattle (Rhinanthus minor) so keep the grass in check. So far it has worked very well and the meadows look beautiful in late spring and summer. Apart from cutting everything down in August and another cut in late winter there is no other maintenance required. It is important to sow a native perennial seed mix, not annual cornfield flowers, which are also offered as wildflower meadow seeds.


9. Keep bare ground covered

Nearly every inch is covered with plants
 I try to keep every bare ground covered at most times, either with plants or dead organic matter such as grass cuttings and other dead plant material or compost. Bare ground is an invitation for weed seeds to germinate and leaves the soil open to the elements. Rain often compacts the upper soil layer which turns into a hard crust. Rain also washes nutrients out of the soil. If covered with a nice organic blanket of dead or living plants the worms and other soil life are happy and productive and keep the soil healthy. There is also a lot less weeding to do.


10. Provide food and shelter for wildlife

A mason bee (Osmia bicornis)
A lot of food and shelter can already be provided by most of the points above, but there are also a few additional things we can add to make life easier for animals who visit our space and will also provide us with a opportunity to observe them. A bee hotel is an easy option, which provides nesting chambers for some solitary bees, mainly mason bees and leaf-cutter bees. The bee hotel needs to be positioned in a sunny place sheltered from wind and rain, best would be a south-facing house or shed wall. Mason bees will build their nests in spring and I find it very entertaining to watch their comings and goings. Leaf-cutter bees will be nesting much later, in July, and the females can be seen flying around with large pieces of leaves to line their nesting chambers. It is best to put the bee hotel somewhere cold and dry, such as inside a shed, in winter. It can also be carefully cleaned. More information on this can be found here.

The hole on the bottom right was used by a leaf-cutter bee

To provide nest boxes and additional food for birds are other options. I have put up a nest box on the allotment shed wall but which has not been used so far. Fingers crossed I get some guests next spring. From autumn to early spring I am feeding the birds as well which provides not only a life-line for many birds in a cold winter but also a lot of joy to me. Sometimes in winter, when there is not a lot to do on the allotment anymore, I will just go there to watch the birds. Another thing I added to the allotment is a hedgehog box which was used by my resident hedgehog most of the spring and summer.


Feeding and watching birds in winter is fun
My hedgehog house
A robin is patiently waiting for the great tit to finish eating

I hope I could give you some inspiration. If you have any more ideas to make our gardens and allotments more wildlife friendly I would love to hear about it.

New Wildlife Allotment blog

 I have started a new monthly blog about my wildlife allotment a few years ago for the Hardy Plant Society. I you are interested you can rea...

Popular Posts